
Contact Form 7 là một trong những plugin tạo form phổ biến nhất trên nền tảng WordPress. Tuy nhiên, mặc định Contact Form 7 chỉ gửi dữ liệu qua email, không tự lưu thông tin khách hàng vào Google Sheet.
Trong bài viết này, Sơn Web sẽ hướng dẫn bạn cách đồng bộ dữ liệu Contact Form 7 lên Google Sheet tự động bằng Google Apps Script và một đoạn code PHP nhỏ trong WordPress.Cách làm này phù hợp với các website cần lưu thông tin khách hàng, form tư vấn, form báo giá, form đăng ký dịch vụ hoặc form liên hệ.
Lợi ích khi đồng bộ Contact Form 7 lên Google Sheet
Việc đưa dữ liệu từ CF7 lên Google Sheet giúp bạn:
- Lưu thông tin khách hàng tự động sau mỗi lần gửi form.
- Dễ dàng quản lý dữ liệu trên Google Sheet.
- Hạn chế thất lạc thông tin nếu email gửi form bị lỗi.
- Có thể chia sẻ file Google Sheet cho đội sale, chăm sóc khách hàng hoặc quản lý.
- Không cần cài thêm plugin nặng trên website.
- Có thể tùy biến dữ liệu theo từng field của form.
Chuẩn bị trước khi thực hiện
Bạn cần có:
- Một Website WordPress đã cài plugin Contact Form 7.
- Một file Google Sheet để lưu dữ liệu.
- Quyền chỉnh sửa theme hoặc dùng plugin Code Snippets.
- Một chút thao tác với Google Apps Script.
Trong ví dụ này, form Contact Form 7 có các field sau:
[your-name]
[tel-sdt]
[select-dv]
[your-message]
Ý nghĩa các field:
your-name     = Họ tên
tel-sdt       = Số điện thoại
select-dv     = Dịch vụ / tình trạng khách chọn
your-message  = Nội dung khách gửi
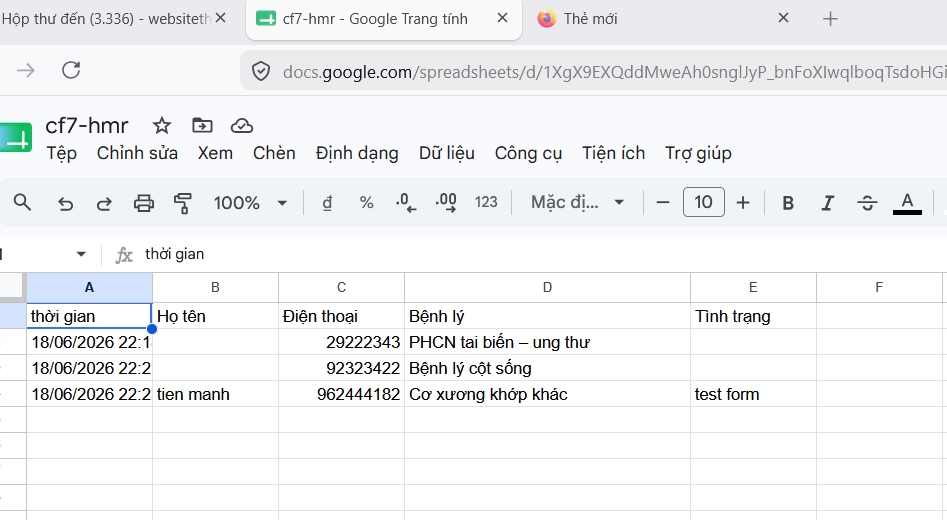
Bước 1: Tạo Google Sheet lưu dữ liệu
Đầu tiên, bạn tạo một file Google Sheet mới.
Đặt tên file tùy ý, ví dụ:
Dữ liệu Contact Form 7
Sau đó, đổi tên tab bên dưới thành:
cf7-hmr
Lưu ý: trong Google Sheet có 2 loại tên:
Tên file Google Sheet: nằm phía trên
Tên tab sheet: nằm phía dưới góc trái
Trong code Apps Script, chúng ta sẽ dùng tên tab sheet, không phải tên file.
 Bước 2: Tạo form trong Contact Form 7
 Bước 2: Tạo form trong Contact Form 7
Trong WordPress, vào:
Liên hệ → Contact Forms → Thêm mới
Tạo form với các field như sau:
[submit “Gửi thông tin”]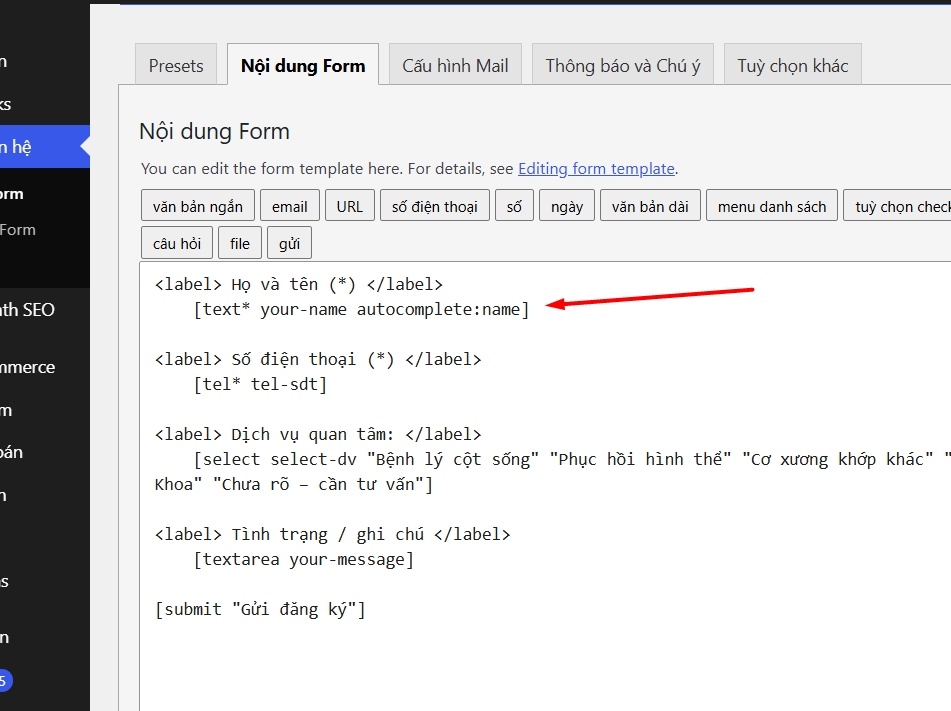
Sau khi tạo form, bạn lưu lại shortcode của Contact Form 7 để chèn ra trang liên hệ.
Bước 3: Mở Google Apps Script
Trong Google Sheet, bạn vào:
Tiện ích mở rộng → Apps ScriptNếu giao diện tiếng Anh thì là:
Extensions → Apps ScriptSau đó Google sẽ mở trình chỉnh sửa Apps Script.
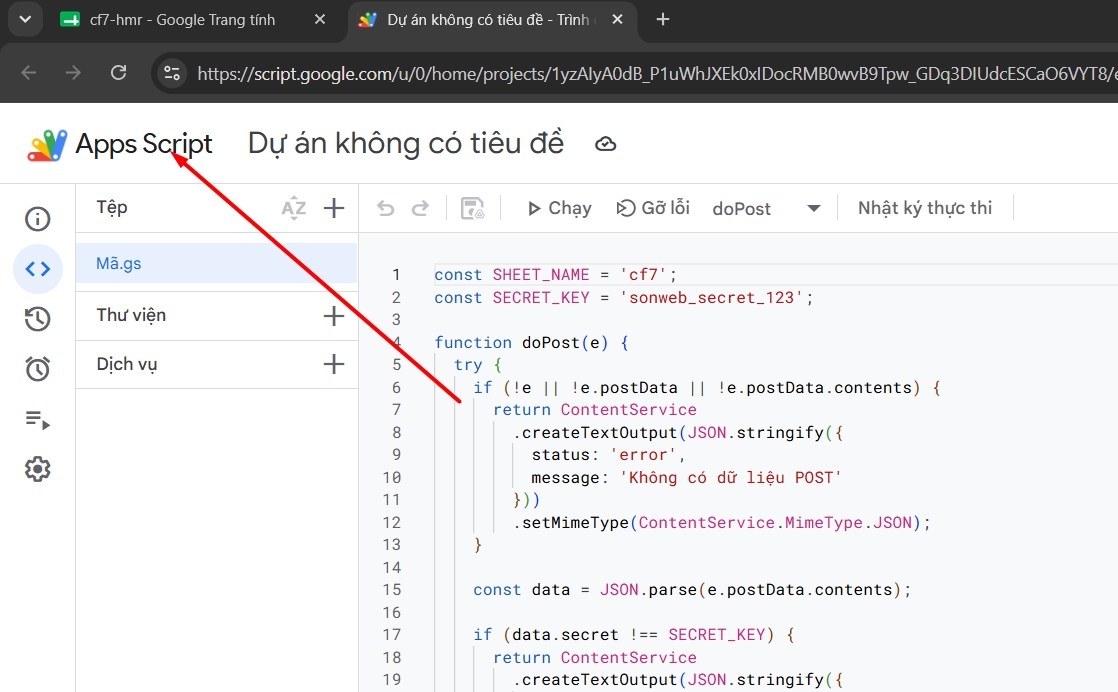
Bước 4: Dán code Google Apps Script
Bạn xóa code mặc định trong Apps Script và dán đoạn code sau:
const SHEET_NAME = ‘cf7—-‘;
const SECRET_KEY = ‘sonweb_secret_123’;
function doPost(e) {
try {
if (!e || !e.postData || !e.postData.contents) {
return ContentService
.createTextOutput(JSON.stringify({
status: ‘error’,
message: ‘Không có dữ liệu POST’
}))
.setMimeType(ContentService.MimeType.JSON);
}
const data = JSON.parse(e.postData.contents);
if (data.secret !== SECRET_KEY) {
return ContentService
.createTextOutput(JSON.stringify({
status: ‘error’,
message: ‘Invalid secret’
}))
.setMimeType(ContentService.MimeType.JSON);
}
let sheet = SpreadsheetApp
.getActiveSpreadsheet()
.getSheetByName(SHEET_NAME);
if (!sheet) {
sheet = SpreadsheetApp
.getActiveSpreadsheet()
.insertSheet(SHEET_NAME);
sheet.appendRow([
‘Thời gian’,
‘Họ tên’,
‘Số điện thoại’,
‘Dịch vụ’,
‘Nội dung’
]);
}
sheet.appendRow([
new Date(),
data[‘your-name’] || ”,
data[‘tel-sdt’] || ”,
data[‘select-dv’] || ”,
data[‘your-message’] || ”
]);
return ContentService
.createTextOutput(JSON.stringify({
status: ‘success’,
message: ‘Đã ghi dữ liệu vào Google Sheet’
}))
.setMimeType(ContentService.MimeType.JSON);
} catch (error) {
return ContentService
.createTextOutput(JSON.stringify({
status: ‘error’,
message: error.message
}))
.setMimeType(ContentService.MimeType.JSON);
}
}
function testDoPost() {
const fakeEvent = {
postData: {
contents: JSON.stringify({
secret: ‘sonweb_secret_123’,
‘your-name’: ‘Nguyễn Văn A’,
‘tel-sdt’: ‘0909123456’,
‘select-dv’: ‘Dịch vụ test’,
‘your-message’: ‘Test gửi dữ liệu’
})
}
};
const result = doPost(fakeEvent);
Logger.log(result.getContent());
}
function doGet(e) {
return ContentService
.createTextOutput(‘Google Apps Script đang hoạt động’)
.setMimeType(ContentService.MimeType.TEXT);
}
Bước 5: Test Google Apps Script
Trước khi kết nối với WordPress, bạn nên test Apps Script trước.
Trong Apps Script, chọn hàm:
testDoPost
Sau đó bấm:
Chạy
Nếu Google Sheet có thêm một dòng dữ liệu test như:
Nguyễn Văn A | 0909123456 | Dịch vụ test | Test gửi dữ liệu
thì phần Apps Script đã hoạt động đúng.
Hình minh họa 5: Chạy testDoPost trong Apps Script
ALT ảnh: Test Google Apps Script trước khi kết nối WordPress
Caption: Chạy hàm testDoPost để kiểm tra dữ liệu có được ghi vào Google Sheet hay không.
Bước 6: Triển khai Apps Script thành Web App
Sau khi test thành công, bạn cần triển khai Apps Script thành Web App.
Vào:
Triển khai → Lần triển khai mới
Chọn loại triển khai:
Ứng dụng web
Cấu hình như sau:
Thực thi dưới dạng: Tôi
Ai có quyền truy cập: Bất kỳ ai
Sau đó bấm:
Triển khai
Google sẽ cấp cho bạn một đường dẫn Web App có dạng:
https://script.google.com/macros/s/xxxxxxxxxxxxxxxx/exec
Bạn copy lại link này để dùng trong code PHP ở WordPress.
Bước 7: Kiểm tra link Web App
Sau khi triển khai xong, bạn mở link Web App trên trình duyệt.
Nếu trình duyệt hiển thị:
Google Apps Script đang hoạt động
thì link Web App đã hoạt động.
Lưu ý, link đúng cần có đuôi:
/exec
Không dùng link có đuôi:
/dev
Bước 8: Thêm code PHP vào WordPress
Tiếp theo, bạn thêm đoạn code PHP sau vào website WordPress.
Bạn có thể thêm bằng một trong hai cách:
Cách 1: Dán vào file functions.php của child theme
Cách 2: Dùng plugin Code Snippets
Code PHP:
add_action(‘wpcf7_submit’, ‘sw_send_cf7_to_google_sheet_debug’, 10, 2);
function sw_send_cf7_to_google_sheet_debug($contact_form, $result) {
$submission = WPCF7_Submission::get_instance();
if (!$submission) {
error_log(‘CF7 Google Sheet Error: Không lấy được submission’);
return;
}
$posted_data = $submission->get_posted_data();
error_log(‘CF7 Posted Data: ‘ . print_r($posted_data, true));
$webhook_url = ‘https://script.google.com/macros/s/xxxxx/exec’;
$your_name = isset($posted_data[‘your-name’])
? sanitize_text_field($posted_data[‘your-name’])
: ”;
$tel_sdt = isset($posted_data[‘tel-sdt’])
? sanitize_text_field($posted_data[‘tel-sdt’])
: ”;
$select_dv = isset($posted_data[‘select-dv’])
? $posted_data[‘select-dv’]
: ”;
if (is_array($select_dv)) {
$select_dv = implode(‘, ‘, array_map(‘sanitize_text_field’, $select_dv));
} else {
$select_dv = sanitize_text_field($select_dv);
}
$your_message = isset($posted_data[‘your-message’])
? sanitize_textarea_field($posted_data[‘your-message’])
: ”;
$body = array(
‘secret’ => ‘sonweb_secret_123’,
‘your-name’ => $your_name,
‘tel-sdt’ => $tel_sdt,
‘select-dv’ => $select_dv,
‘your-message’ => $your_message,
‘form_id’ => $contact_form->id(),
‘form_title’ => $contact_form->title(),
‘page_url’ => isset($_SERVER[‘HTTP_REFERER’]) ? esc_url_raw($_SERVER[‘HTTP_REFERER’]) : ”,
);
error_log(‘CF7 Google Sheet Body: ‘ . print_r($body, true));
$response = wp_remote_post($webhook_url, array(
‘method’ => ‘POST’,
‘timeout’ => 20,
‘redirection’ => 5,
‘headers’ => array(
‘Content-Type’ => ‘application/json’,
),
‘body’ => wp_json_encode($body),
));
if (is_wp_error($response)) {
error_log(‘CF7 Google Sheet WP Error: ‘ . $response->get_error_message());
return;
}
error_log(‘CF7 Google Sheet Response Code: ‘ . wp_remote_retrieve_response_code($response));
error_log(‘CF7 Google Sheet Response Body: ‘ . wp_remote_retrieve_body($response));
}
Bạn cần thay đoạn:
$webhook_url = ‘https://script.google.com/macros/s/xxxxx/exec’;
bằng link Web App thật của bạn.
Một số lỗi thường gặp và cách xử lý
1. Lỗi không tìm thấy sheet
Nếu Apps Script báo lỗi:
Không tìm thấy sheet: cf7-hmr
Nguyên nhân là tên tab trong Google Sheet chưa đúng.
Bạn cần kiểm tra lại dòng:
const SHEET_NAME = ‘cf7-hmr’;
Tên cf7-hmr phải trùng với tên tab bên dưới Google Sheet.
2. Số điện thoại lưu được nhưng họ tên không lưu
Lỗi này thường do tên field không khớp.
Nếu Contact Form 7 dùng field:
[your-name]thì PHP phải gửi:
‘your-name’ => $your_name
và Apps Script phải đọc:
data[‘your-name’]
Không nên dùng:
data.your-name
vì dấu gạch ngang sẽ bị JavaScript hiểu sai.
3. Đổi code Apps Script nhưng website vẫn chưa nhận
Sau khi sửa Apps Script, bạn cần triển khai lại:
Triển khai → Quản lý các lần triển khai → Chỉnh sửa → Phiên bản mới → Triển khai
Nếu chỉ bấm Lưu mà không triển khai lại, link Web App /exec có thể vẫn chạy code cũ.
4. Link Web App báo không tìm thấy tệp
Bạn cần kiểm tra lại link Web App.
Link đúng có dạng:
https://script.google.com/macros/s/xxxxxxxxxxxxxxxx/exec
Không dùng link project Apps Script hoặc link /dev.
5. Contact Form 7 gửi mail lỗi nên dữ liệu không lưu
Trong bài hướng dẫn này, hook được dùng là:
wpcf7_submit
Hook này chạy khi form được submit, phù hợp để test và đồng bộ dữ liệu kể cả khi cấu hình mail có vấn đề.
Có nên dùng plugin đồng bộ CF7 Google Sheet không?
Bạn có thể dùng plugin nếu muốn thao tác nhanh. Tuy nhiên, cách dùng Google Apps Script và PHP hook có một số ưu điểm:
Không cần cài thêm plugin nặng
Chủ động kiểm soát dữ liệu
Dễ tùy biến field
Có thể dùng cho nhiều form khác nhau
Dễ debug khi lỗi
Với các website dịch vụ, landing page, website bán hàng hoặc website tư vấn, cách này rất phù hợp để lưu lead khách hàng tự động.
Kết luận
Trên đây là hướng dẫn chi tiết cách đồng bộ Contact Form 7 lên Google Sheet bằng Google Apps Script và PHP hook trong WordPress.
Chỉ cần cấu hình đúng tên field giữa 3 phần:
Contact Form 7
PHP WordPress
Google Apps Script
thì mỗi khi khách gửi form, dữ liệu sẽ tự động được lưu vào Google Sheet. Đây là giải pháp đơn giản, nhẹ và hiệu quả để quản lý thông tin khách hàng từ website WordPress.
